

By Michael Jenkins

Autumn is here in may parts of the world, and with it comes a slower time in the garden. While fall and winter often can’t match summer’s bounty, they do give us some time to plan for the season to come. Thinking about what we’ll be planting in the spring is one of the great joys of this time of the year, and propagating plants from cuttings can make that easier. Taking cuttings of established plants and using them to start anew in the spring is often easier than starting from seeds and lets you get a head start on spring planting. And, as it turns out, taking cuttings from garden plants is generally pretty easy. Let’s take a closer look at propagating plants from cuttings, and how to do it at home.
The first step in propagating plants from cuttings is to identify the plant you’d like to take a cutting from. This plant, also called the mother plant, should be the healthiest, most vibrant, or most productive in your garden. When taking a cutting, you’re effectively cloning the mother plant, so choose one that has the traits you desire most. You can take multiple cuttings from the same mother plant, but use common sense. Larger plants can donate more cuttings, but be careful not to take too many and thus damage the mother plant if you’d like to keep it in your garden.
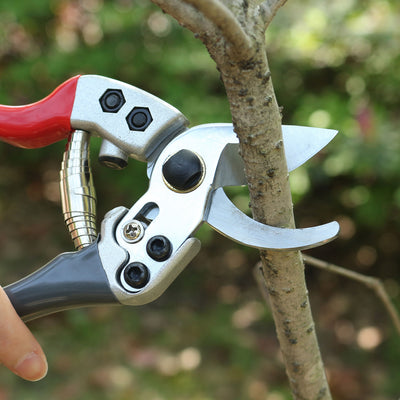
The next step is to find the right tools. A pair of sharp, clean garden shears or hand pruners is a must for taking successful cuttings. Clean tools are less likely to transmit plant diseases or pests, so give them a good rinse and clean them thoroughly before taking a cutting for propagation. You’ll also need a place to safely store your cuttings while you’re gathering them. We like to take a cutting, wrap a damp paper towel around the base, and place the whole thing in a sealable plastic bag temporarily. This helps keep the cutting hydrated and alive while you’re working until you transplant it.
The actual process of taking a cutting for propagation is fairly direct and easy. Using your cleaned, sharp garden shears, identify a healthy stem or offshoot of the main plant with bright new growth on it. Using a stem with new growth helps ensure that the cutting is healthy enough and lively enough to take root. You’ll want a stem that’s 2-4 inches (5-10cm) long, and ideally a stem that shows several nodes—nodes being the bump-like place where leaves are or were attached to the plant. Take a cutting of the right length by making a quick cut straight through the stem. After taking the cutting, be careful not to handle it by the cut end—that can lead to damage, disease, or pests taking over. If necessary, remove all excess leaves from your cutting, leaving only a few of the new growth ones at the very top. Place your cutting in the damp paper towel and plastic bag arrangement we discussed earlier and keep it out of direct sun while you gather more.
Now that you have your cuttings, what to do with them? The ideal home for new cuttings is a large garden container or seed starting tray with good drainage, filled with fresh damp potting soil. Potting soil works best for new cuttings as it has the nutrition they need to thrive. Use a stick or your finger to poke holes in the soil to place the new plants it. Do this instead of pushing the cutting stem directly into the soil, as that can damage the stem and compromise your cuttings. Plant your cuttings deep enough that they can stand up unsupported; you can gently push more soil around them as long as you don’t compact it. It’s also important not to overcrowd your cuttings—in generally an 8 inch (20cm) container can hold five or six cuttings comfortably. If using a seed starting tray, one cutting per cell is almost always best.
Keep the soil moist but not soaked. You may want to cover the container loosely with a clear plastic bag to help keep moisture in, but make sure it’s loose enough to allow air flow—plants need to breathe, too! If you are using Gardzen seed starter trays, most of them have the humidity domes which come with air vent to let air in and control the temperature, being ideal containers for cuttings. The container with the cuttings should be kept in a sunny place, but out of direct sunlight and away from too much heat. Extremes of temperature can kill of your cuttings before they get a chance to take root.

As they develop roots, keep the soil damp but not saturated and check on them daily. Problems can develop quickly, and you’ll want to take action if they do. If your container has holes in the bottom, check to see if you can see roots developing. This generally takes a week or two. When the plants have fully developed roots, it’s probably safe to transplant them to a larger grow container and give them a bit more light. At this point, just treat them as you would any other seedlings and keep them health until spring arrives!
Leave a comment